The Many Different Steps
to Making
One of my Animal Birthday Cards
It's been a while since I posted anything here, so I thought I would share how I made this one adorable little birthday card.
I had to learn how to do this technique. Believe you me, there was a lot of trial and error when I first attempted this. I wanted to figure out how to make it look like there was a cupcake a bit behind the other cupcakes and I wanted the animals to sit on top of the frosting. So, I watched a video and set off to attempt it myself. There are a LOT of different steps to it, so here we go:
- In preparation for the design, I hand stamp each separate image onto a piece of Post It note with Memento Tuxedo Black Ink, then hand cut around the images. I usually do several of the same image, especially if I am going to use the same animal or cupcake. These are called masks.


- I take each cut out mask and lay them out into the design I want. I use the backside of a shipping label that I had saved. By doing this, I have the ability to move things around and get it just right before any stamping is done.

Now it's time to stamp. I use Neenah solar white 110 lb card stock and Memento Tuxedo Black Ink. I also use a Mini Misti Stamping tool, which makes this so easy.
- I lay the above paper with masks into the Misti. I take the lion and bear stamps, line them up over the masks of the lion and bear, close the lid so the stamps stick to the door, open the door, remove the paper with the masks, put my card stock into place, ink the images, close the door and stamp them.


- After that is stamped, I remove the stamps and card stock and I take the lion and bear masks and place them on top of the stamped images.


- I put my paper with the masks back into the Misti and take the two frosting stamps, place them on top of the masks, close the door to stick them to the door, etc., remove the mask paper, put in my card stock, ink them and stamp the frosting under the lion and then do the frosting for the bear.


- I take the masks for the each frosting and place them on the stamped images.


- I put the paper with the masks back into the Misti and take the stamp for the cupcake holder, lay it on top of the mask, pick it up on the door, remove the paper and put the card stock back in, ink and stamp the image. Since I only have one of these stamps, I have to do this step twice.


- I take the cupcake holder masks and add them to the stamped images.


- I put the paper with the remaining masks into the Misti and take the bunny stamp and place it over the mask, pick it up onto the door, replace the mask paper with card stock, ink and stamp the image.


- I take the bunny mask and cover the image with it. I then do the same steps as already mentioned, and then stamp the frosting under the bunny.


- I use the frosting mask and add that to the stamped image.


- The last step: stamp the cupcake holder under the frosting.


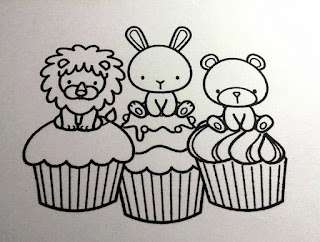
This is what it looks like after all of the masks are removed.


And this is the final card.
The images have been colored with Copic markers.
For the inside of the card as well as the envelope, I added some more stamps just for fun :)

You can find this card here as well as many other stamped cards I have done along with all my handmade cards in my Etsy shop and my ArtYah shop!
Thanks for taking a look and I hope you now have some idea just how much time and love go into all of my cards.